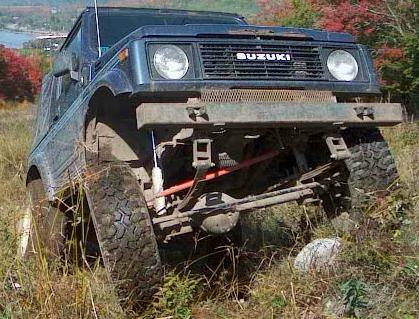
Spring Over Axle (SOA) Conversion Overview
This is not a step-by-step instruction guide to a Spring Over Axle conversion. This is an overview to let you know what is involved. Your SOA kit should come with detailed instructions.
What is a Spring Over Axle (SOA) Conversion?
A spring over axle (SOA) conversion is straightforward with a few key considerations. The angle that the spring pads are mounted on the axle tube is very important. Improper driveshaft angles can cause vibration and reduce u-joint life. If you’re adding additional lift (e.g., lift springs), ensure proper driveline pinion angles. For more information, see Pinion & U-Joint Angles
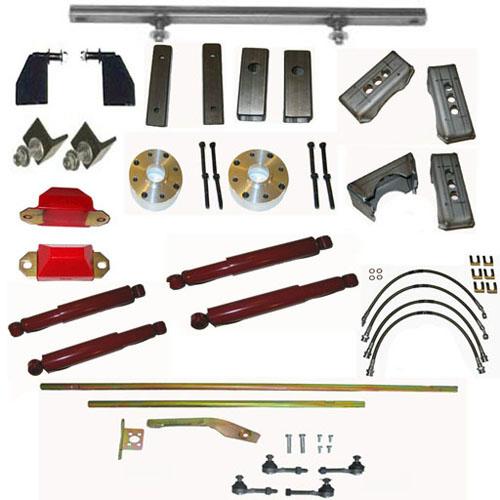
SOA Kits
Companies like Petroworks offer complete SOA kits.
Tools & Materials You’ll Need
- SOA Kit
- Welder
- Grinder
- Jack and jack stands
- Large c-clamp
- Brake fluid
- Differential (gear) oil
- Assorted metric sockets and wrenches
Disassembly Overview
- Remove all four wheels.
- Remove all four shocks.
- Remove the front and rear flexible brake lines.
- Remove brake line clips from flexible brake line connectors.
- Plug the rigid brake lines where they’re open under the vehicle.
- Disconnect and remove the emergency brake cable from each rear wheel.
- Remove the front and rear drive shafts.
- Drain the front and rear differentials.
- Remove the stabilizer and stabilizer brackets.
- Remove the steering damper.
- Separate the pitman arm from the drag link.
- Remove the nut and washer from the steering box shaft.
- Using a puller, remove the Pitman arm from the steering box shaft.
Installation Process
Process:
- Remove the inner shackle plate from the shackle. Lower each spring down clear of the axle. Remove the axle from under the vehicle. Remove the rigid metal brake lines from the axle.
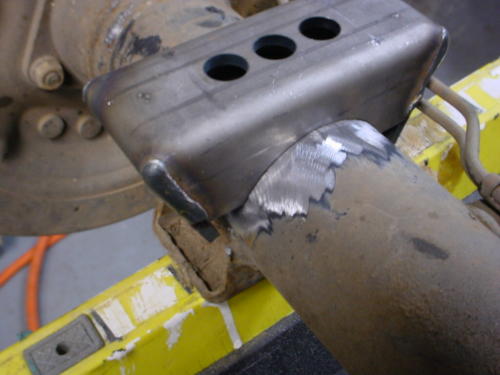
Place the rear axle on jackstands. Weld the spring perches on the opposite side (top) of the axle tube. Make sure it’s directly lined up (centered) and parallel (even) with the bottom perch. You can ensure alignment by measuring the distance between the new perch and old perch at each end. If unequal, the perches are not parallel.
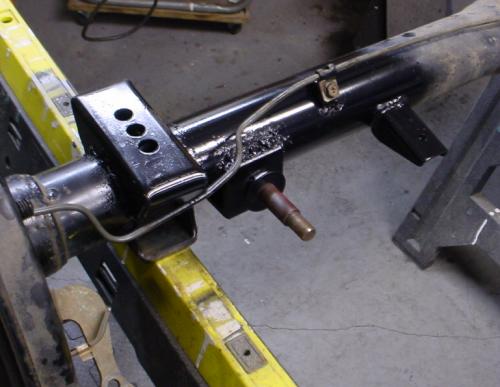
These pics show the rear axle and brake lines. Brake line brackets must be moved to make room for the new spring perches. Lower shock mounts should be tacked in place with the axle temporarily mounted and shocks installed.
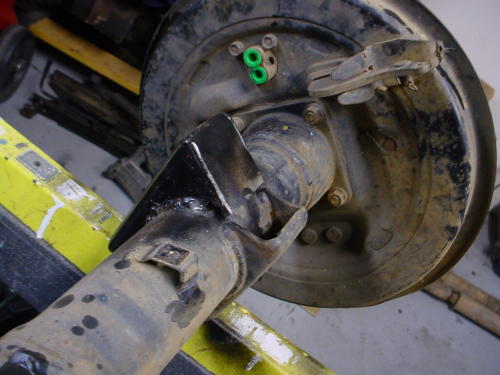
The front axle is similar to the rear but pay close attention to the angle of the spring perches. They must be parallel to the existing perches to maintain proper steering angles.
You will need to either add a dropped pitman arm or use a new drag link setup that relocates the drag link above the springs to prevent bump steer.
Check your brake hose routing to ensure it does not contact the tire.
The parking brake cable will be too short after doing an SOA. You can make an extension for the factory bracket if your SOA kit doesn’t already provide one.
Welding the Spring Perches
Welding the perches onto the tubes should be done by a qualified welder. Some people set the new perches on the axle tube with springs on the perches and u-joints loose, rotate the axle to get the proper driveline angle, then weld them in place. Others calculate the perch angle and weld with the axle on jackstands. Weld in short sections to avoid heat transfer and warping the axle tube.
Don’t Forget
- Refill front and rear differentials with SAE 80W-90, 75W-80, or 75W-90 hypoid gear oil (Suzuki recommends 75W-90).
- BLEED THE BRAKE SYSTEM! The Samurai uses a dual diagonal system; bleed the wheel cylinder farthest from the master cylinder first and keep the master cylinder full.
- Recheck all bolts, nuts, and torque settings after driving briefly to ensure everything remains tight.