|
1.6L 8-Valve Timing Specs |
|
| Ignition Timing (deg) Manual Transmission | 8 Degrees Before |
| Ignition Timing (deg) Automatic Transmission | 8 Degrees Before |
| Firing Order | 1-3-4-2 (Clockwise) |
1989–90 1.6L Engines
- Start the engine and allow it to warm up to normal operating temperature.
- Be sure that all of the electrical loads, except for the ignition switch, are OFF. If equipped, ensure that the air conditioning is OFF.
- Apply the parking brake and place the gearshift in Neutral (manual transmissions) or Park (automatic transmissions).
- Check the idle speed to ensure that it is 750–850 rpm. If it is not, adjust the idle speed prior to adjusting ignition timing.
- Turn the ignition switch OFF.
- Install the inductive timing light according to the manufacturer’s instructions. The timing light input lead should always be attached to the No. 1 cylinder spark plug wire.
- Start the engine and allow it to idle. The ignition timing marks are located on a tab attached to the engine
When using the timing light, be sure to keep yourself and all tools away from moving and hot engine components. Do not wear loose clothing when working around a running engine, otherwise personal injury or death may result. - Use the timing light to read the ignition timing by pointing the light at the timing marks (located on the crankshaft pulley and timing belt cover tab) and pulling the light’s trigger.
- If the ignition timing, is not 8 degrees BTDC at 750–850 rpm engine speed, adjust the timing.
- To adjust the ignition timing, loosen the distributor flange bolt(s) and rotate it until the proper ignition timing is within specifications. Turn the distributor counterclockwise to advance, and clockwise to retard the ignition timing. Tighten the distributor flange bolt(s) securely.
Fig. 5: To adjust the ignition timing, rotate the distributor housing counterclockwise to advance timing and clockwise to retard timing 
- After adjusting the ignition timing and tightening the distributor flange bolts, recheck the ignition timing to ensure that it did not change while tightening the distributor flange bolts.
- Shut the engine OFF, then remove the inductive timing light from the vehicle.
1991–93 1.6L Engines
- Start the engine and allow it to warm up to normal operating temperature.
- Turn off the engine, turn the ignition switch ON for 5 seconds, then start the engine again and run it at 2000 rpm for 5 minutes. This will ensure that the engine is properly warmed up.
- Be sure that all of the electrical loads, except for the ignition switch, are OFF. If equipped, ensure that the air conditioning is OFF.
- Apply the parking brake and place the gearshift in Neutral (manual transmissions) or Park (automatic transmissions).
- Check the idle speed to ensure that it is 800 rpm. If it is not, adjust the idle speed prior to adjusting ignition timing.
- Turn the ignition switch OFF.
- Install the inductive timing light according to the manufacturer’s instructions. The timing light input lead should always be attached to the No. 1 cylinder spark plug wire.
- Remove the cover from the monitor connector, located beside the right-hand head light assembly, and, using a jumper wire, connect terminals C and D. Grounding terminal C to terminal D will fix the ignition timing (prevent the timing from moving).
- Start the engine and allow it to idle. CAUTION
When using the timing light, be sure to keep yourself and all tools away from moving and hot engine components. Do not wear loose clothing when working around a running engine, otherwise personal injury or death may result. - Use the timing light to read the ignition timing by pointing the light at the timing marks (located on the crankshaft pulley and timing belt cover tab) and pulling the light’s trigger.NOTE: If the timing fluctuates or changes, terminal D is not properly grounded to terminal D.
- If the ignition timing, with terminal D properly grounded, is not 7–9 degrees BTDC at 800 rpm engine speed, adjust the timing.
- To adjust the ignition timing, loosen the distributor flange bolts and rotate it until the proper ignition timing is within specifications. Turn the distributor counterclockwise to advance, and clockwise to retard the ignition timing. Tighten the distributor flange bolts securely.
- After adjusting the ignition timing and tightening the distributor flange bolts, recheck the ignition timing to ensure that it did not change while tightening the distributor flange bolts.
- Detach the jumper wire from the monitor connector.NOTE: With this jumper wire removed, the ignition timing may fluctuate, which is normal.
- Observe the ignition timing marks with the timing light while increasing engine speed. The ignition timing should advance as the engine speed increases. If the engine speed does not advance, inspect the TP sensor, the test switch terminal circuit, the engine start signal circuit and PCM. WARNING
Driving the vehicle with the monitor connector terminals grounded will result in catalytic converter damage; be sure to remove the jumper wire prior to driving the vehicle. - Shut the engine OFF, then remove the inductive timing light from the vehicle. Install the monitor connector cover.
1994–98 1.6L and 1.8L Engines
- Start the engine and allow it to warm up to normal operating temperature.
- Be sure that all of the electrical loads, except for the ignition switch, are OFF. If equipped, ensure that the air conditioning is OFF.
- Apply the parking brake and place the gearshift in Neutral (manual transmissions) or Park (automatic transmissions).
- Check the idle speed to ensure that it is within specifications. If it is not, adjust the idle speed prior to adjusting ignition timing.
- Turn the ignition switch OFF.
- Install the inductive timing light according to the manufacturer’s instructions. The timing light input lead should always be attached to the No. 1 cylinder spark plug wire.
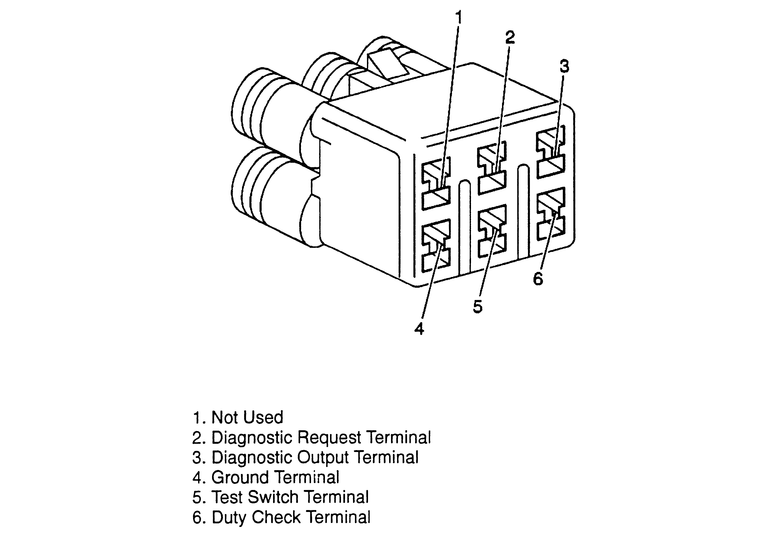
- Remove the cover from the Duty Check Data Link Connector (DC-DLC), located beside the right-hand headlight assembly (1994–96 models) or next to the battery (1997–98 models), and, using a jumper wire, connect DC-DLC connector cavities 4 and 5. Grounding cavity 5 to cavity 4 will fix the ignition timing (prevent the timing from moving).
- Start the engine and allow it to idle.
Fig. 6: Before attempting to inspect the ignition timing, use a small jumper wire to ground the test switch terminal (5) to the ground terminal (4) of the DC-DLC 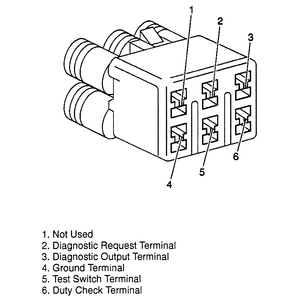
When using the timing light, be sure to keep yourself and all tools away from moving and hot engine components. Do not wear loose clothing when working around a running engine, otherwise personal injury or death may result. - Use the timing light to read the ignition timing by pointing the light at the timing marks (located on the crankshaft pulley and timing belt cover tab) and pulling the light’s trigger.NOTE: If the timing fluctuates or changes, cavity 5 is not properly grounded to cavity 4.
- If the ignition timing, with terminal 5 properly grounded, is not 4–6 degrees BTDC at 750–850 rpm engine speed, adjust the timing.
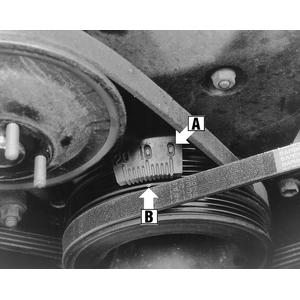
- To adjust the ignition timing, loosen the distributor flange bolts (1.6L engines) or the Camshaft Position (CMP) sensor bolts, and rotate it until the proper ignition timing is within specifications. Turn it counterclockwise to advance, and clockwise to retard the ignition timing. Tighten the distributor flange bolts securely, or tighten the CMP bolts to 133 inch lbs. (15 Nm).
Fig. 7: On 1.8L engines, loosen the CMP sensor bolts and rotate the sensor to adjust ignition timing 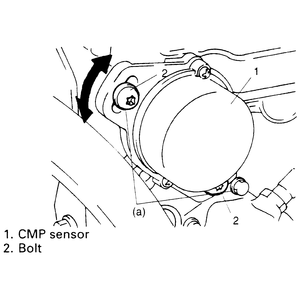
- After adjusting the ignition timing and tightening the distributor flange bolts, recheck the ignition timing to ensure that it did not change while tightening the distributor flange bolts.
- Detach the jumper wire from the DC-DLC.NOTE: With this jumper wire removed, the ignition timing may fluctuate, which is normal.
- Observe the ignition timing marks with the timing light while increasing engine speed. The ignition timing should advance as the engine speed increases. If the engine speed does not advance, inspect the TP sensor, the test switch terminal circuit, the engine start signal circuit and PCM. WARNING
Driving the vehicle with the DC-DLC terminals grounded will result in catalytic converter damage; be sure to remove the jumper wire prior to driving the vehicle. - Shut the engine OFF, then remove the inductive timing light from the vehicle. Install the DC-DLC cover.